10. Led/relay Control by the Browser
Connection of Led with Arduino:
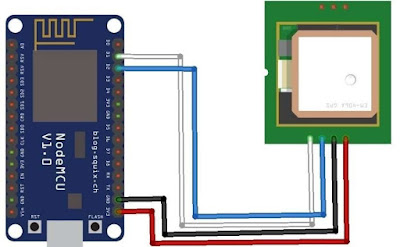
Led have two terminals, first is positive terminal and second is Negative
Terminal. The Negative Terminal is connected to the Ground pin of ESP8266
module and Positive Terminal is connected to the 220ohm Resistance and the
other side of resistance is connected to the D7 pin of ESP8266 Module.
Circuit Diagram:

Program:
#include <ESP8266WiFi.h>
const char* ssid =
"manish"; // SSID i.e. Service Set Identifier is the name of your
WIFI
const char* password
= "manish8294"; // Your Wifi password, in case you have open network
comment the whole statement.
int ledPin = 13; //
GPIO13 or for NodeMCU you can directly write D7
WiFiServer server(80); // Creates a server that listens for incoming connections on the specified port, here in this case port is 80.
void setup()
{
Serial.begin(115200);
delay(10);
pinMode(ledPin,
OUTPUT); digitalWrite(ledPin, LOW);
//
Connect to WiFi network Serial.println(); Serial.println();
Serial.print("Connecting to "); Serial.println(ssid);
WiFi.begin(ssid,
password);
while
(WiFi.status() != WL_CONNECTED) { delay(500);
Serial.print(".");
}
Serial.println("");
Serial.println("WiFi connected");
// Start
the server server.begin(); Serial.println("Server started");
// Print the IP
address
Serial.print("Use
this URL to connect: "); Serial.print("http://");
Serial.print(WiFi.localIP()); //Gets the WiFi shield's IP address and
Print the IP address of serial monitor
Serial.println("/");
}
void
loop() {
// Check if
a client has connected WiFiClient client =
server.available(); if (!client) {
return;
}
// Wait
until the client sends some data Serial.println("new client"); while(!client.available()){
delay(1);
}
// Read the first
line of the request
String
request = client.readStringUntil('\r'); Serial.println(request);
client.flush();
// Match the request
int value = LOW;
if (request.indexOf("/LED=ON")
!= -1) { digitalWrite(ledPin, HIGH);
value = HIGH;
}
if
(request.indexOf("/LED=OFF") != -1) { digitalWrite(ledPin, LOW);
value = LOW;
}
// Set ledPin
according to the request
//digitalWrite(ledPin,
value);
// Return
the response client.println("HTTP/1.1 200 OK");
client.println("Content-Type: text/html");
client.println(""); // do not forget this one
client.println("<!DOCTYPE HTML>"); client.println("<html>");
client.print("Led
pin is now: ");
if(value == HIGH)
{ client.print("On");
} else {
client.print("Off");
}
client.println("<br><br>");
client.println("<a
href=\"/LED=ON\"\"><button>Turn On
</button></a>"); client.println("<a
href=\"/LED=OFF\"\"><button>Turn Off </button></a><br
/>"); client.println("</html>");
delay(1);
Serial.println("Client
disonnected"); Serial.println("");
}
Then we upload the code in ESP8266 Module
and Open Serial
monitor and the WIFI
connection and IP address is appear as shown in figure.

Then copy the URL link and open in Browser then Led on and Off Buttons is present thenclick the buttons and see the response in LED connected to ESP8266 Module.


Comments
Post a Comment